This post may include affiliate links, view our disclosure policy for details.
Quick Inspiring Free Crochet Bracelet Project
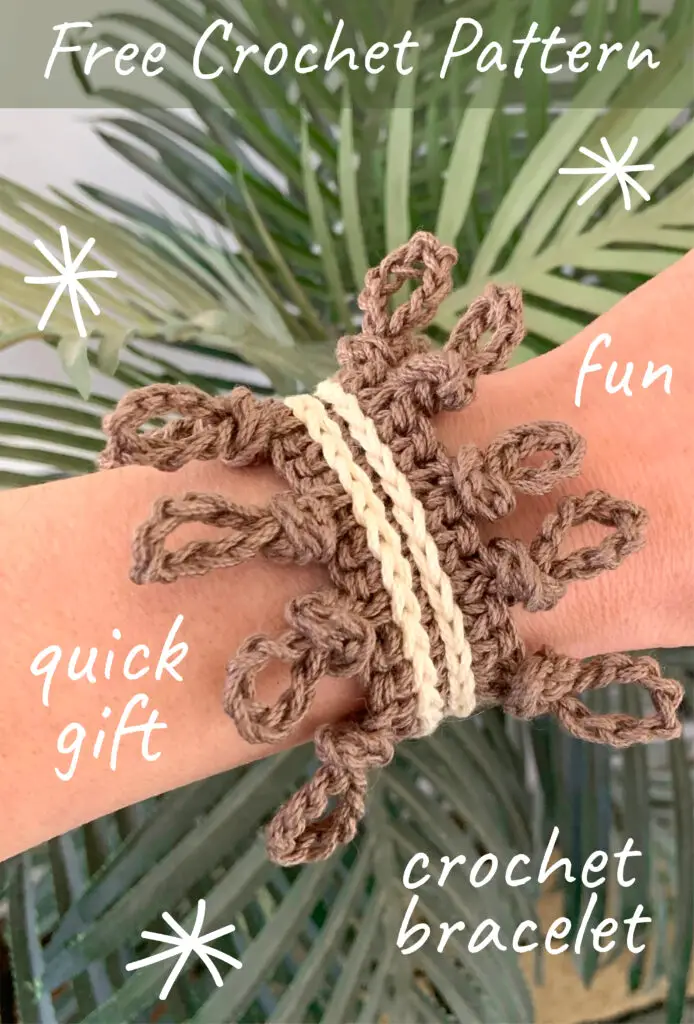
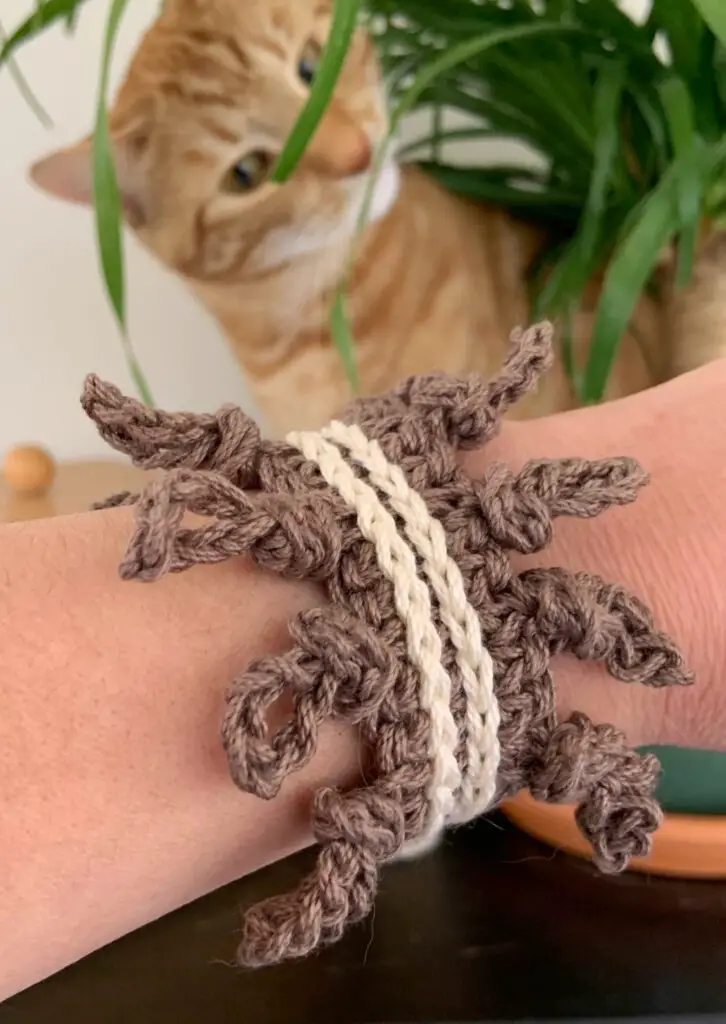
Introducing the Wild Knots Free Crochet Bracelet Pattern. This is the perfect project for the next time you need a fun little crochet break. This project takes less than an hour and only 30 yards of worsted weight yarn.
Making this bracelet is a great way to get a little creative boost and a feeling of accomplishment.
Buy the ad free, easy to print pattern on Etsy or Ravelry now or keep reading for the free pattern.
The paid pdf includes addition materials including a stitch chart, a printable coloring page of the bracelet (for experimenting with color), and my dedicated support email address which are not included in this free version.
Crochet Gift
I was recently looking for a gift for a creative friend and I googled “gift for creative person.” The first suggestion that popped up was statement jewelry.
Wouldn’t this make a great gift? Imagine your creative friend or family member opening this cool handmade gift. They will feel so special and will appreciate that you recognize their creative side. I’m sure they are going to love it.
In fact, this free crochet bracelet pattern is my gift to you, my creative friend.
Creative Statement
You deserve gifts! So make one for yourself.
When you wear it around the city you’ll get tons of compliments from other artistic people. It’s the perfect art piece to wear to a high end craft fair or funky new restaurant.
I had only crocheted blouses and amigurumis so trying accessories was really appealing
Lenith
Story Behind the Design
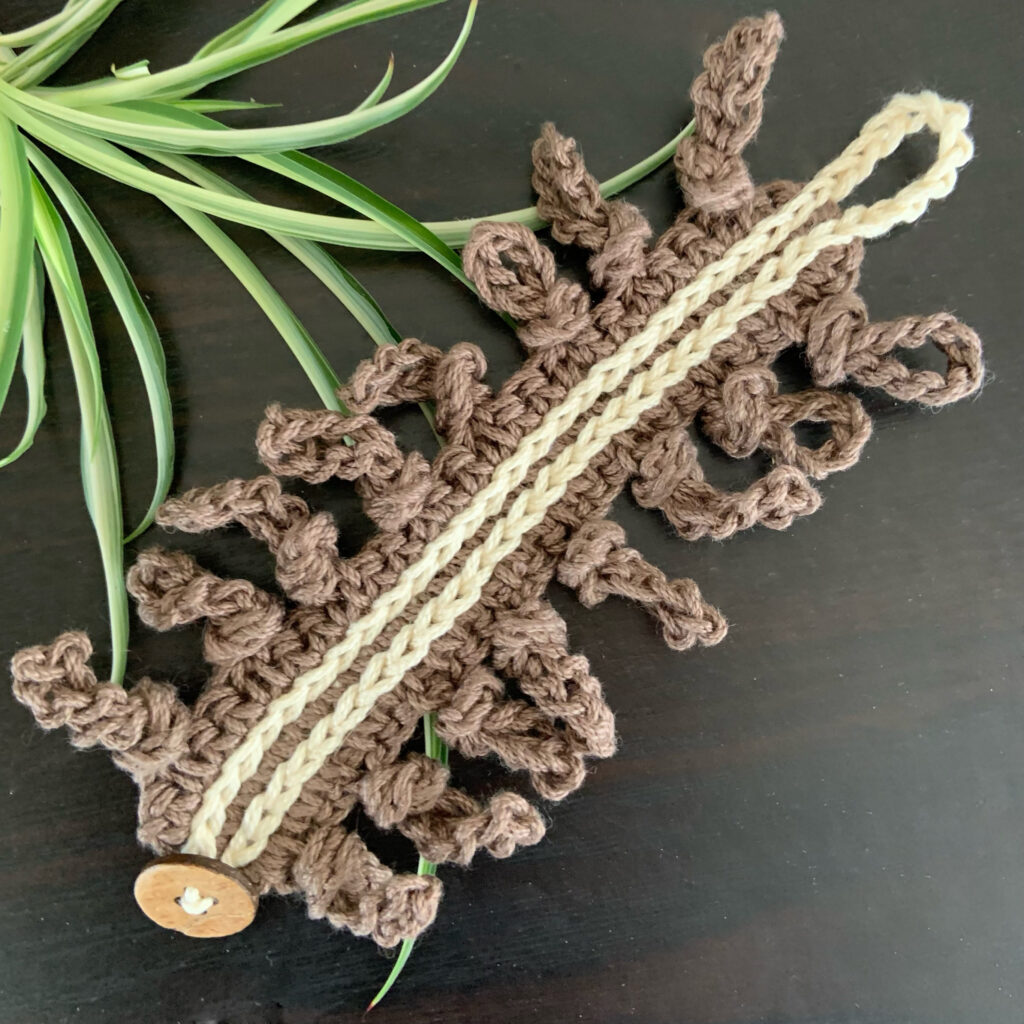
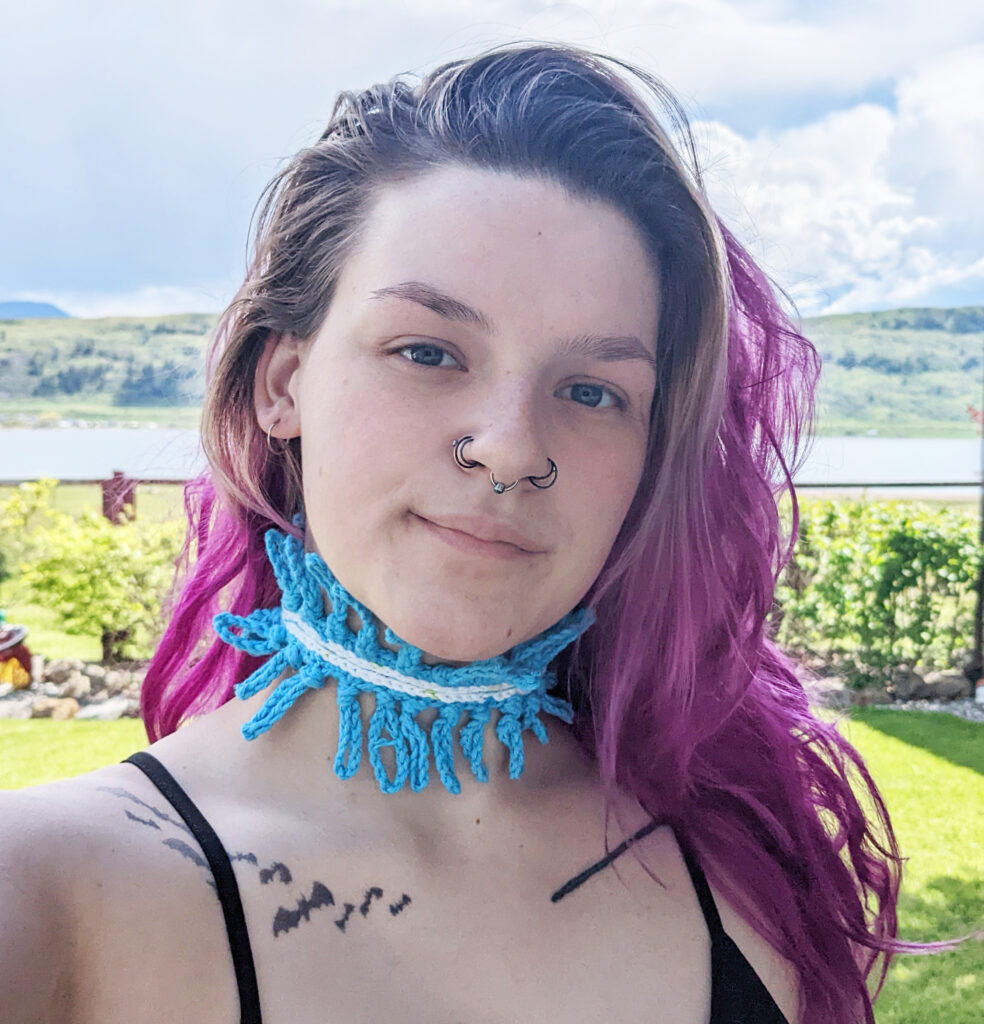
The seed for this free crochet bracelet pattern was planted while I was looking through a book of crochet borders (one of my favorite things to do) and saw this really cool knotted border. I instantly loved it. It just looked so new and fresh to me.
At first I tried to incorporate the border into a top but it was too chunky. Then I tried it on a necklace but it was too wild.
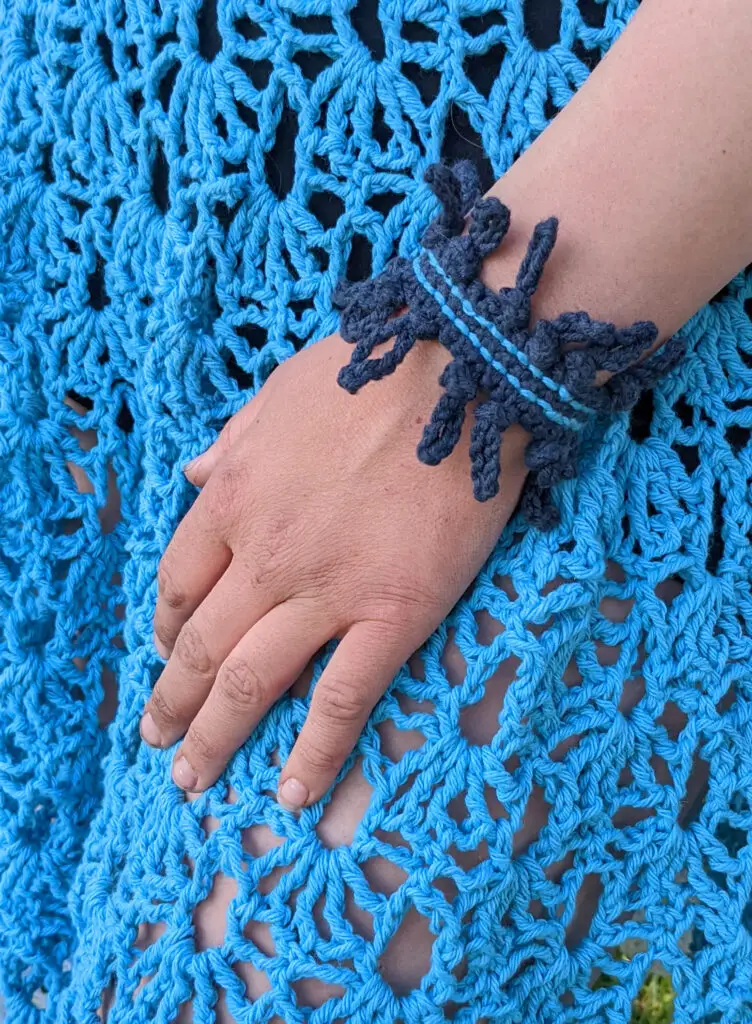
I like to wear the really truly crazy stuff around my wrist. And when I started experimenting with the border on a bracelet pattern this design clicked into place.
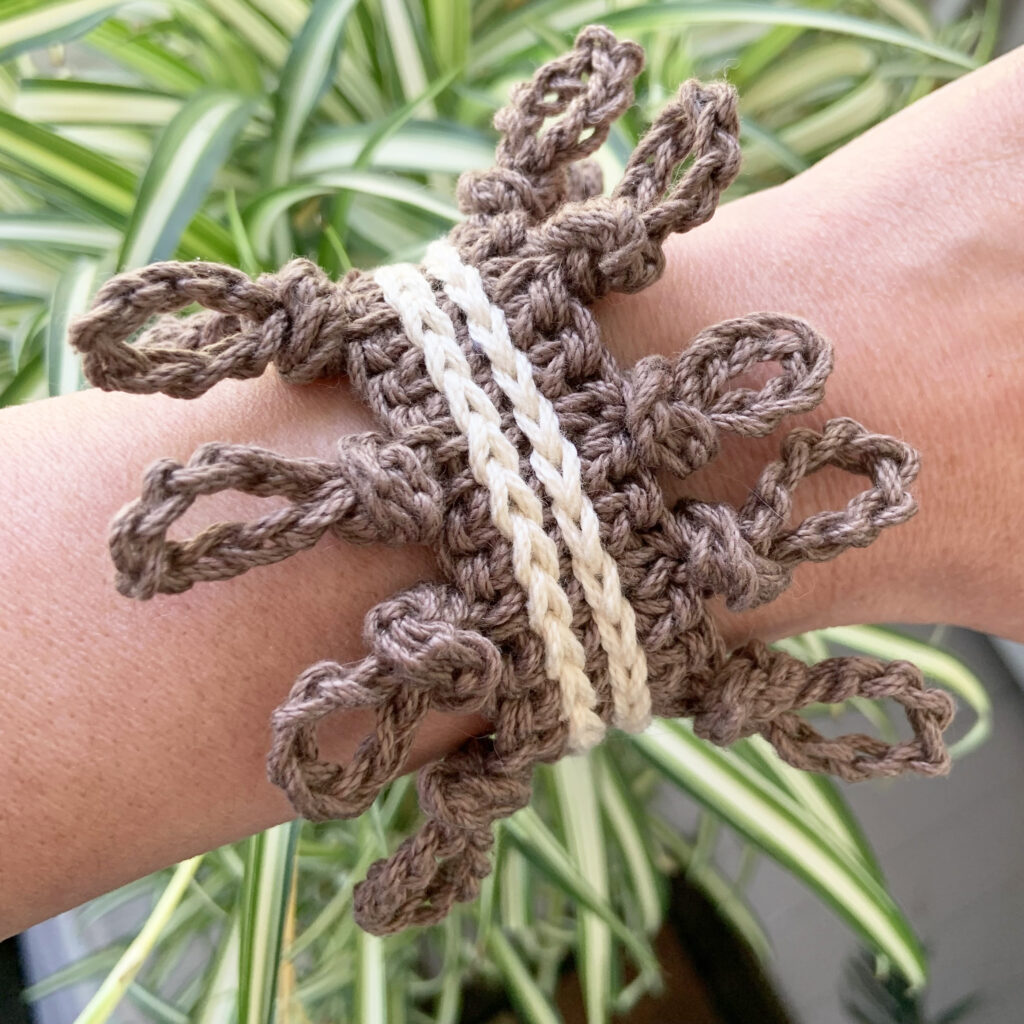
I added the slip stitch surface crochet for a pop of color. And speaking of color, you may be surprised that I went for brown and white on this design as I usually go for brighter colors. But this bracelet has a naturally wild and free feeling so I decided to go with earth tones.
I used two colors but definitely feel free to try the bracelet in more colors or less colors. And speaking of customization, sizes for 8 different wrist circumferences are included.
Crochet Testers
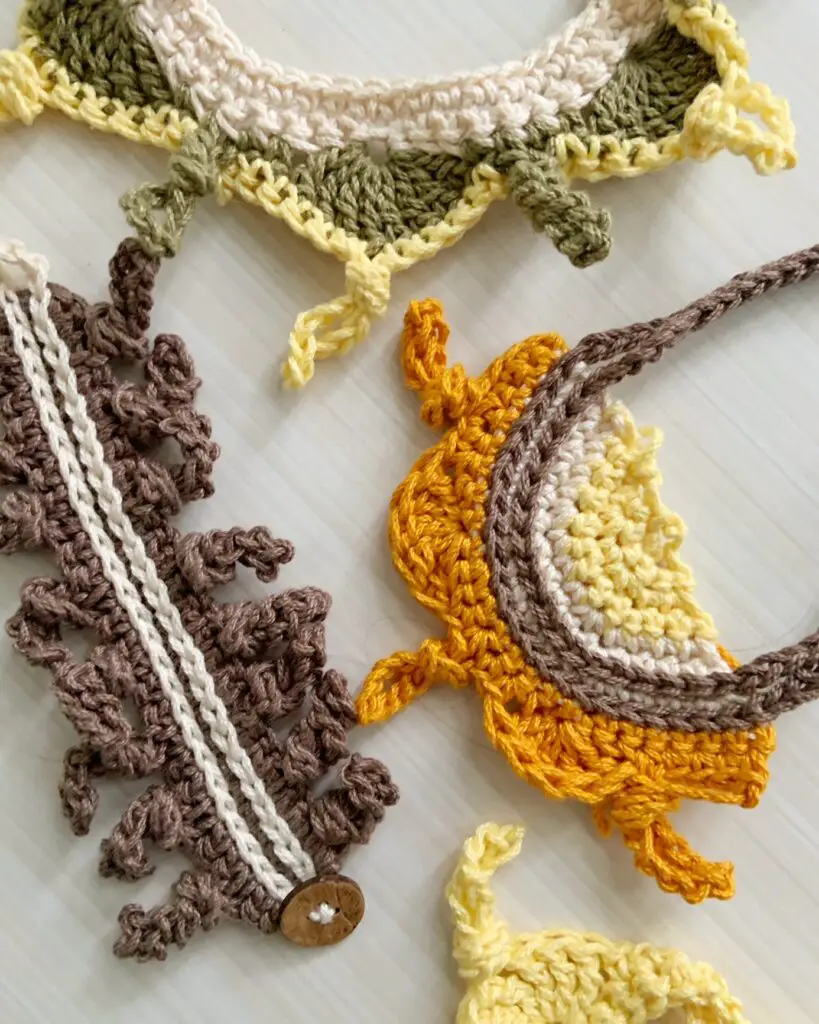
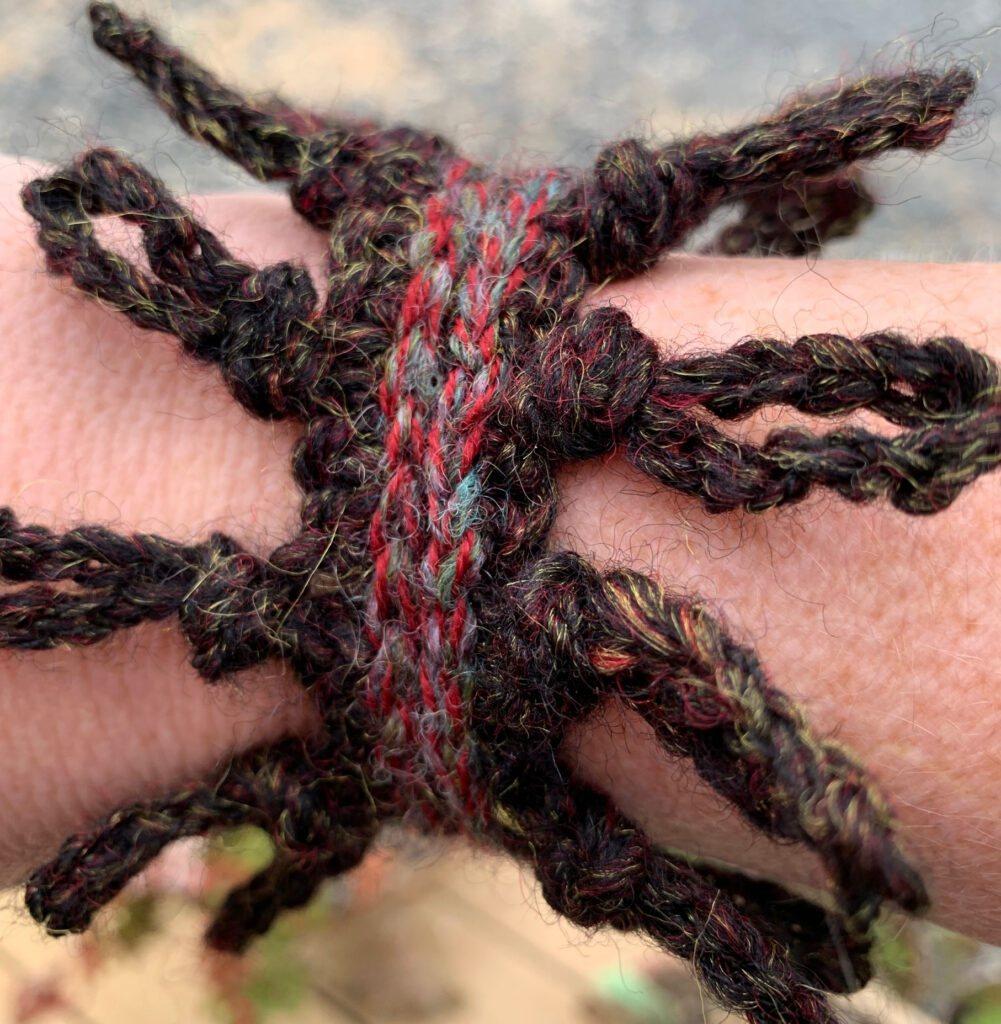
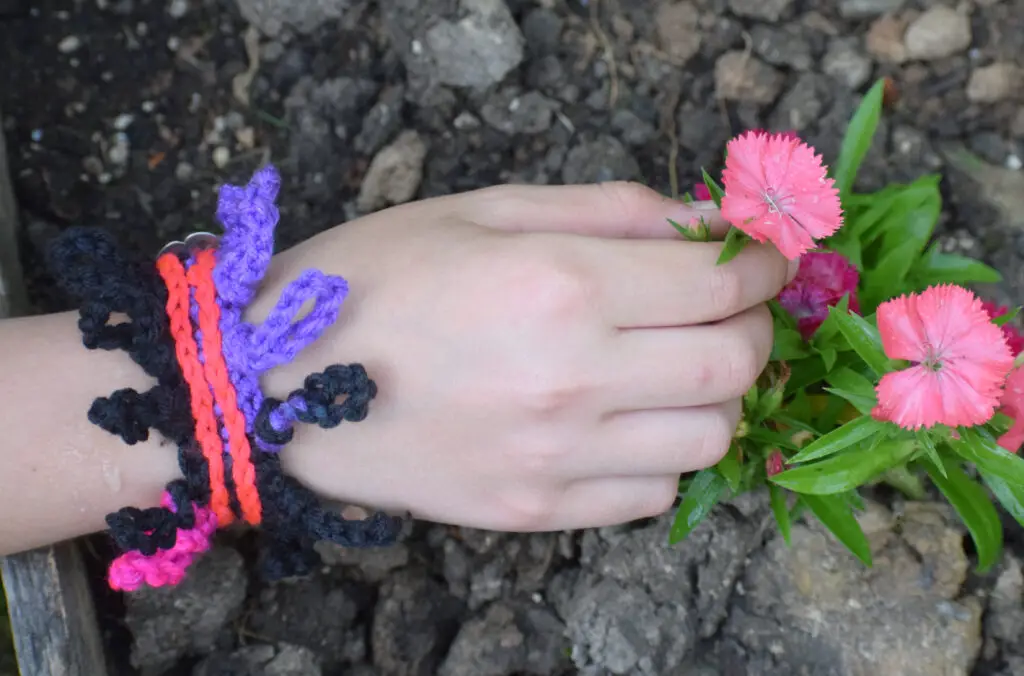
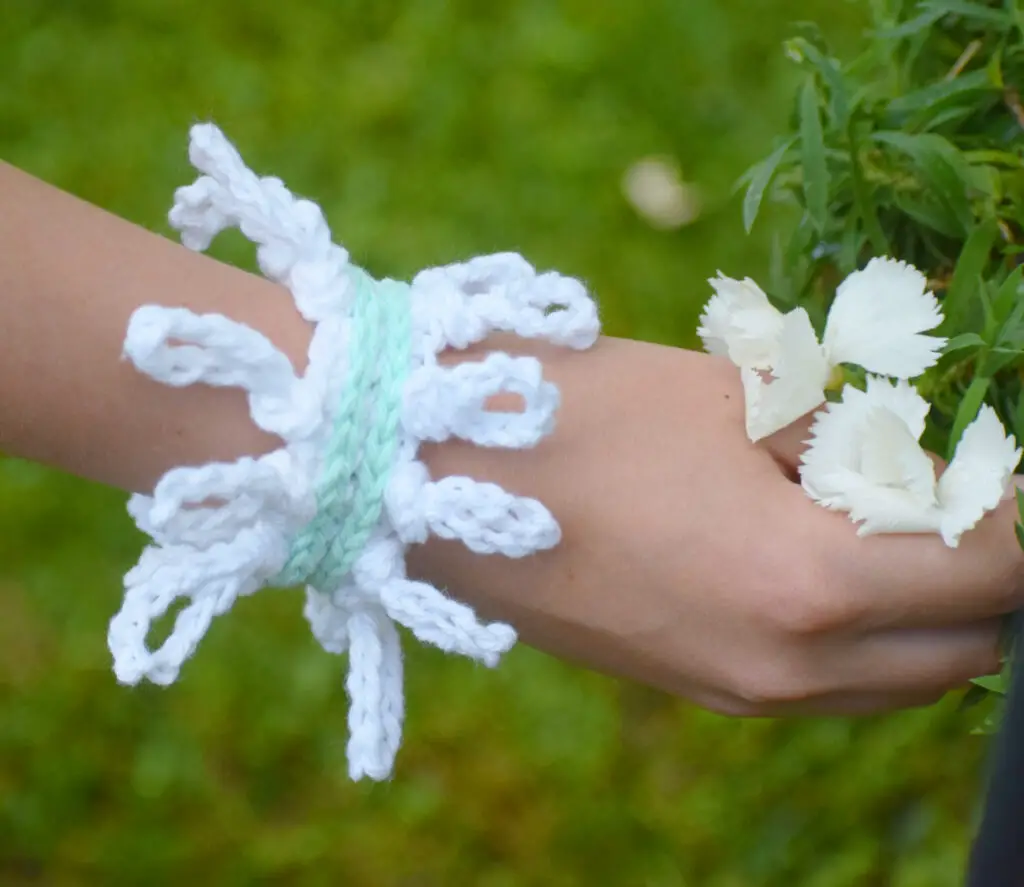
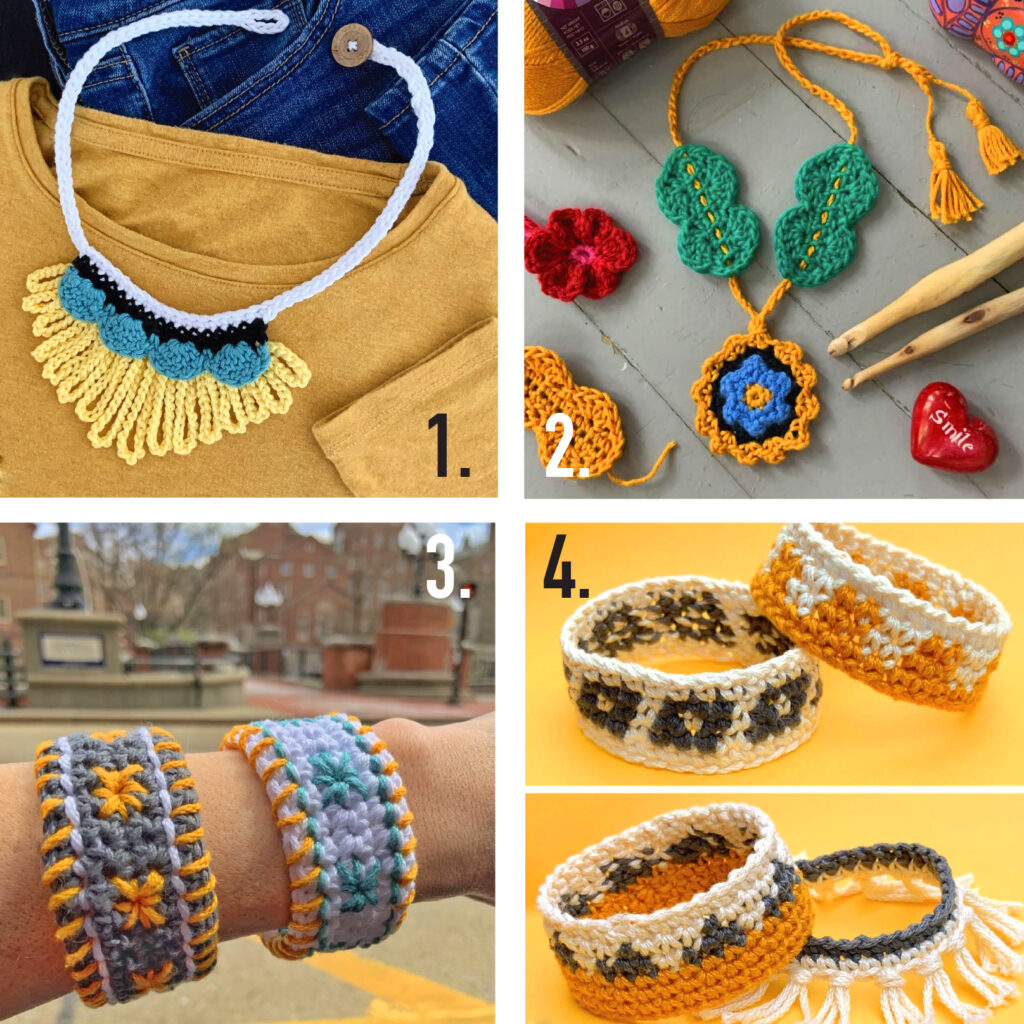
Do you need some inspiration before you start? Here are some inspiring Wild Knots Bracelets by a few of my talented testers.
Be sure to check them out on Instagram (by clicking on their names in the photo credits) if you’d like to see more of their beautiful work.
Wild Knots Free Crochet Bracelet Pattern
Here is your free crochet bracelet pattern. If you would like to see a stitch chart, download a coloring page of the bracelet (for experimenting with color), and receive my dedicated support email address please purchase the ad free, easy to read, easy to print, downloadable pdf.
Buy the ad free pattern on Etsy or Ravelry here or scroll down for the free pattern.
Materials:
- Lion Brand 24/7 Cotton Yarn, worsted weight #4 yarn (100% mercerized cotton; 186 yds / 170 m per 3.5 oz / 100 g skein), 1 skein each of Color (A) Taupe and (B) Ecru

- Crochet hook size US G/6 (4 mm)
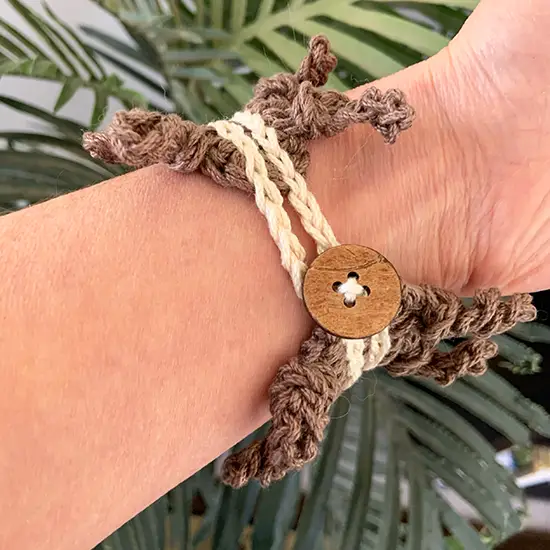
- One 0.75” / 2.5 cm diameter, 4-hole round button
- Tapestry needle
- Scissors
Yardage:
Color A: 19 (21, 23, 25, 27) yds / 17 (19, 21, 23, 25) m
Color B: 3 yds / 3 m
Sizes:
1 (2, 3, 4, 5)
To Fit Wrist Circumference:
5 (6, 6.75, 7.5, 8.25)” / 12.5 (15, 17, 19, 21) cm
Finished Measurements:
Finished Circumference when worn: 6.5 (7.5, 8.25, 9, 9.75)” / 16.5 (19, 21, 23, 25) cm
Gauge:
After first 3 rows of pattern, bracelet should measure 5.25 (6.25, 7, 7.75, 8.5)” /13.5 (16, 18, 19.5, 21.5) cm length and ⅞” / 2 cm width
Crochet Project Level:

According to the Craft Yarn Council’s Yarn Standards. https://www.craftyarncouncil.com/standards/project-levels
Abbreviations:
ch(s) – chain(s)
sc – single crochet
sl st – slip stitch
st(s) – stitch(es)
Notes:
- Ch 1 does not count as a st at beginning of row or round.
- The pattern is written in US terms.
- Stitch count is at end of rows only when it changes from previous row.
- Pattern is written for size 1 with sizes 2, 3, 4, 5 in parentheses. When only one number is written it applies to all sizes. It will be very helpful, for this pattern, to go through and highlight the numbers pertaining to your size.
- Stitch counts for multiple sizes indicated between < >.
- Brackets [ ] indicate part of pattern that should be worked more than once. See instructions after brackets to see how many times or until what point to work.
- This pattern has been tested and professionally tech edited for accuracy and clarity.
- If you would like your knotted loops to be longer and more dramatic add more chs to ch 22 in Row 2 (any number of chs will work).
Instructions
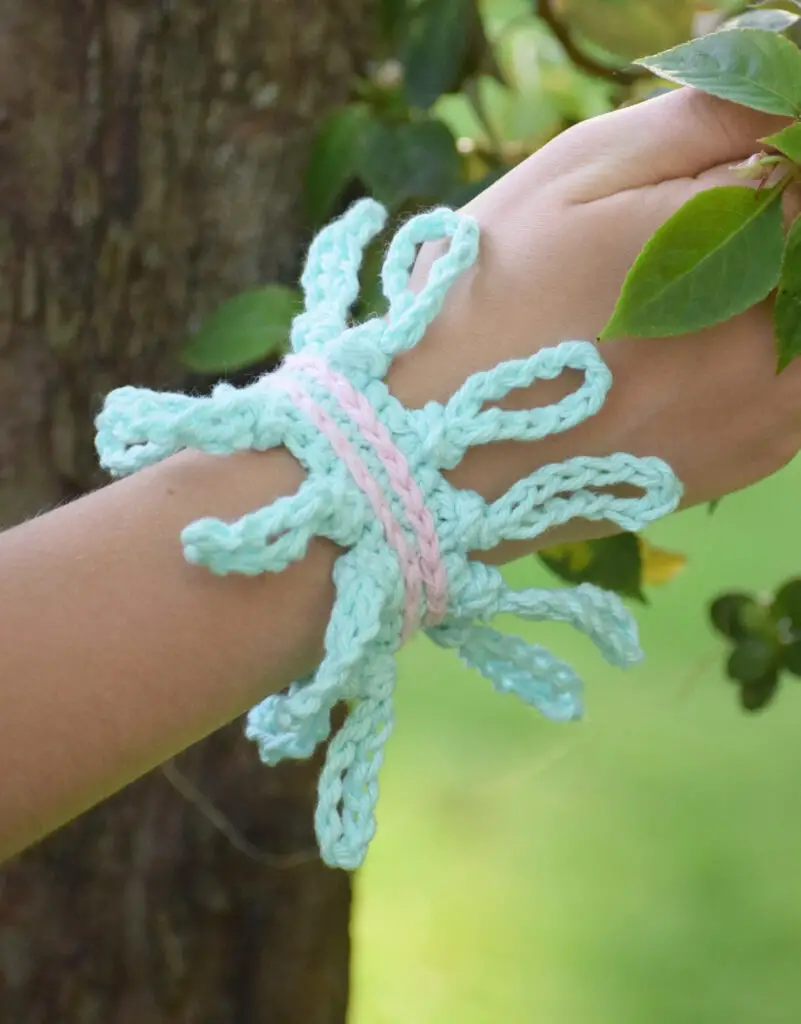
Bracelet
With color A, ch 23 (26, 29, 32, 35)
Row 1: (WS) Work 1 sc in 2nd ch from hook and each ch across, turn– <22 (25, 28, 31, 34) sc>.
Row 2: Ch 1, work 1 sc in first sc, work 1 sc in next sc, ch 22, work 1 sc in next sc (one loop made), [work 1 sc in next 2 sc, ch 22, work 1 sc in next sc (loop made)] across until 1 sc remains, work 2 sc in last sc (rounding the corner) working in the unused side of foundation ch, work 2 sc in next ch, [work 1 sc in next ch, ch 22, work 1 sc in next 2 chs] across– <14 (16, 18, 20, 22) ch-22 loops, 20 (22, 24, 26, 28) sc>.
Fasten off and weave in ends with a tapestry needle. Tie each loop into an overhand knot at base.
Surface Crochet
Hold bracelet so unworked rows are towards you (image 1). You will see two rows of holes between the stitches (image 2).
With RS up and working yarn below bracelet, leaving a tail to attach button, join Color B to bracelet by working 1 sl st into the first space on the right (insert hook into space, pull up a loop, pull through 1 loop (image 3), work 1 sl st in between each stitch across, work 1 sl st around the edge of the sc in row 4 (image 4), ch 9, rotate bracelet 180 degrees, form a loop by working 1 sl st into the first space between the stitches in row 3 (insert hook into space, pull up a loop, pull through 1 loop) (image 5), work 1 sl st in between each stitch across, work 1 sl st around the edge of the last stitch in row 3.
Fasten off leaving a tail to attach button.
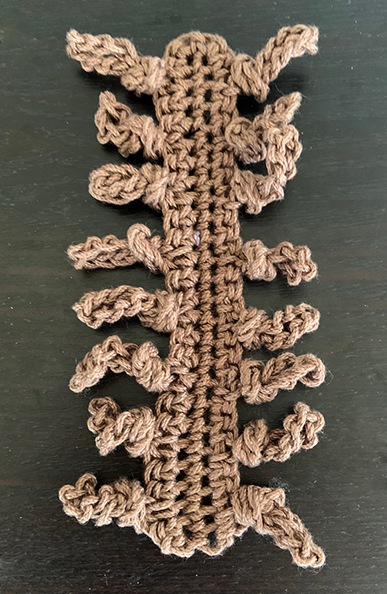
Image 1
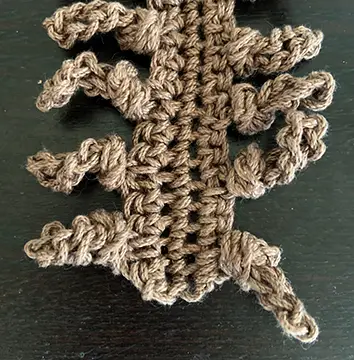
Image 2

Image 3
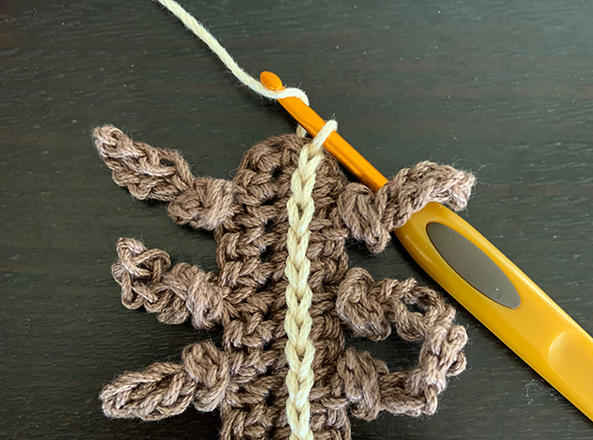
Image 4
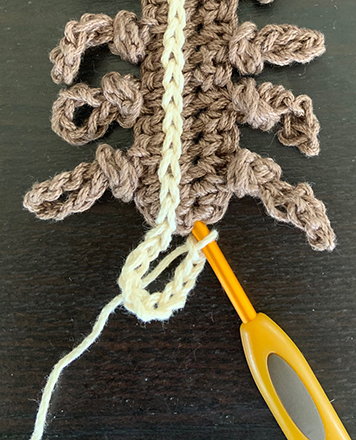
Image 5
Attaching Button:
Thread either end of Color B up through any hole in button. If you have trouble threading yarn through hole use a piece of thread as a needle (image 6). Thread same end down through diagonal hole. Thread other end up through either remaining hole. Thread same end down through remaining diagonal hole. Pull ends so button is positioned tight against end of chain. Tie ends under button. Weave in ends using tapestry needle.
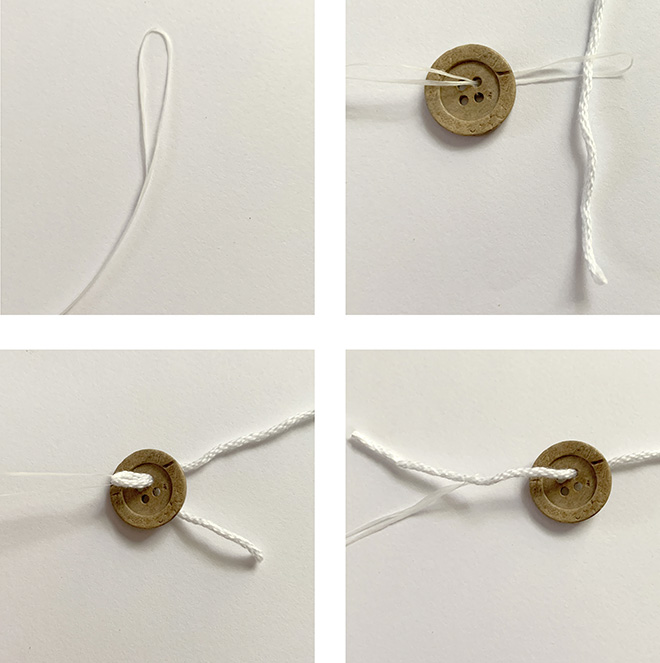
Image 6
Step 1: Cut 6”/15 cm piece of thread, fold in half forming a loop.
Step 2: Thread loop through button hole, thread yarn through loop in the thread.
Step 3: Pull thread until yarn begins to come through hole.
Step 4: Pull end of yarn through hole.
Finishing:
Block.
Congratulations! You are done! Enjoy your bracelet. Wear it proudly and bask in the feeling of creative accomplishment.
Stitch Chart Included with paid pdf

Coloring Page included with paid pdf
Get your creative juices flowing! Print this page and color in the bracelets below with markers, colored pencils, or crayons. Have fun experimenting with different color combinations and placement until you get a bracelet that you love and expresses your creative self. I made my bracelet with 2 colors but it will look great with less or more. Have fun because you can’t go wrong!

Permissions:
Bloggers: Seeking designs for your upcoming roundup? I’d love for you to feature my work! You have my permission to use one photo from my website https://www.crochetwithmarybeth.com/ in your roundup post as long as a link is provided back to the associated pattern page. Please let me know when your post is published so I can share it on my social media, too. Thank you!
Professional Crafters: Please feel free to hand make items to sell with this pattern in small quantities. I’d love it if you could provide a link back to my site when possible. https://www.crochetwithmarybeth.com/ Unfortunately, the photos here can not be used as your sales photos. Thank you!
Manufacturers: Rights to mass produce or factory manufacture in any form are NOT granted.
All: Please do share this pattern with others by sharing the link to the pattern. But do not reprint and distribute or copy and repost this pattern. Thank you!
© Mary Beth Cryan 2021 all rights reserved. You may not, at any time, copy, reproduce, publish in any form, share, sell, dispose of or otherwise make available to a third party in any way, any of the content or materials that I use in the pattern (see full terms and conditions).
For my complete Terms of Use:: https://www.crochetwithmarybeth.com/terms-of-use/
For my complete Privacy Policy: https://www.crochetwithmarybeth.com/privacy-policy/
For my complete Disclaimer: https://www.crochetwithmarybeth.com/%ef%bb%bfdisclaimer/
If you liked this, check out these crochet garments next!


Mary Beth Cryan has been designing crochet patterns for over 4 years. Prior, Mary Beth worked as a professional illustrator and product designer with a specialty in paper crafts for 18 years. She has authored and illustrated 17 paper craft books, countless pop-up greeting cards, and many paper craft kits. She received 3 LOUIE Awards from the National Greeting Card Association. Some of her clients included MoMA (Museum of Modern Art NYC), American Girl, Dover Publications, Peter Pauper Press, Ranger Rick Magazine, Highlights magazine and many others. She earned a Bachelor of Fine Arts from Syracuse University in 2000.