
This post may include affiliate links, view our disclosure policy for details.
Jean is really in style. Not that jeans are ever out of style but right now they are REALLY in style. Like you can walk down the street in New York City in your jean overalls, jean shirt, jean jacket, jean hat, and jean bag and people will say, “that chick has got it together.” This is a moment in history that we REALLY should take advantage of.
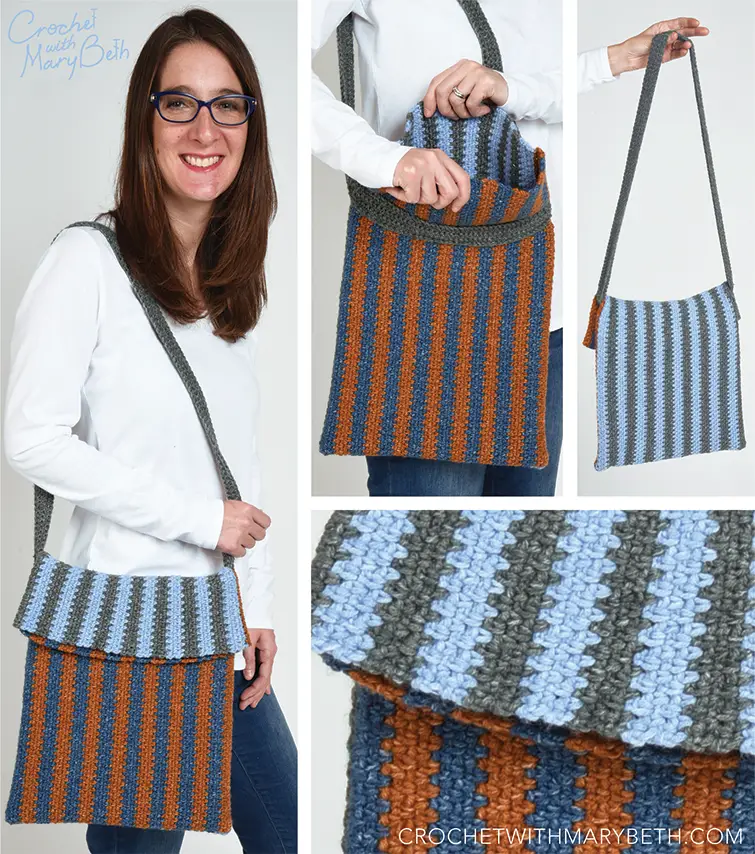
So about that jean bag, that’s what I’m here to help you with. I designed the Slouchy Jean Tote to be casual, cool, go with everything, and be super practical just like your favorite jeans.
Just throw your belongings in the bag, slouch the back over the front and take off running after your kids. No really… run… one of your kids is getting too close to the road and the other is about to put a pebble in his/her mouth. Oh, don’t forget your laptop. It fits perfectly in this tote.
Inspiration & Design
The inspiration for this bag came from the yarn. I wanted to incorporate my four favorite Lion Brand Jeans Yarn colors AND have them all to be visible from the front without the design being an eyesore. Stripes were a given but it took me awhile to think up the slouch over from the back idea. I’m so glad I did! It perfectly shows off all four colors.
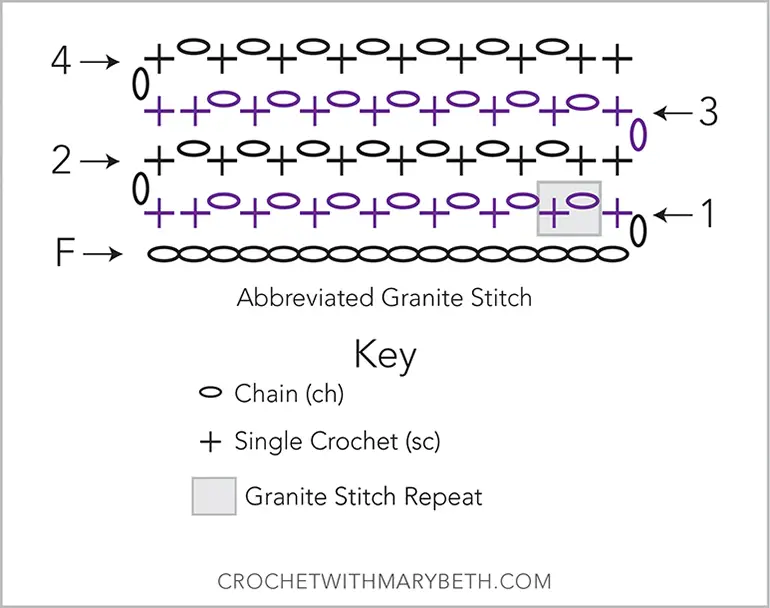
Now about that stitch. I really like the granite stitch and have been itchin’ to use it because it makes such a nice stripe. But my first samples were way to stretchy. Fail! The stitch has too much give. Obviously you don’t want your bag stretching all out of shape when you put your stuff in it. Grrr, what to do?
Lucky I turned my stitch swatch on its side and found this stitch is nice and tight in this direction. Also, I was totally loving the resulting vertical stripe. It’s such a great moment when the design details come together!
I hope the Slouch Jean Tote works out to be your perfect go to tote!
Purchase the pdf:
The ad-free, printable PDF pattern is available on Etsy.
Save for later:
Add this pattern to your Ravelry queue.
PIN this pattern to your Pinterest Boards for later.
Slouchy Jean Tote Crochet Pattern
Materials:
- Lion Brand Jeans Yarn, worsted 4-Medium (100% acrylic, 246 yds/225 m, 3.5 oz/100 g), 1 skein each of Color (A) Top Stitch, Color (B) Stonewash, Color (C) Faded Jeans, Color (D) VintageCrochet hook size US G/6 (4 mm)
- Tapestry needle
- Pins, I use Clover Bamboo Marking Pins
- Scissors
The yarn for the sample bag was generously provided free by Lion Brand.
Gauge:
11.5 stitch repeats and 22 rows = 4”/10 cm in the granite stitch, 1 stitch repeat = ch 1, sk 1 sc, work 1 sc in ch-1 sp, see stitch chart below
Finished Measurements:
Tote: 11.5”/29 cm wide and 12.5”/32 cm tall when bag is closed and without strap, 26”/66 cm tall with strap
Strap: 42.5”/108 cm long before assembly, 31”/78 cm after assembly
Project Level:

Abbreviations:
- ch – chain(s)
- sc – single crochet
- st(s) – stitch(es)
- sp – space
- RS – right side
- WS – Wrong Side
Notes:
- The pattern is written in US terms.
- This pattern has been tested and professionally tech edited for accuracy and clarity.
- Ch 1 does not count as a sc throughout the pattern.
- The front and back panels of the tote are worked side to side and then seamed together on three edges.
- Strap length can be adjusted by adding or removing chains to your preference. The chain MUST be modified by an even number of chains. Every 2 chains modifies the strap 0.5”/13 mm.
- When seaming the tote you will lay the RS and WS together. Strange but true!
- Do not use color D to create your gauge swatch. This is the color that you will use for the strap so you will need almost the whole skein for the pattern.
- Each panel has 16 stripes (8 of one color and 8 of the other).
Instructions
Front Panel
With color A, ch 101.
Row 1: Work 1 sc in 2nd ch from hook, (ch 1, sk 1 ch, work 1 sc in next ch) repeat across until 1 ch remains, work 1 sc in last ch, turn- (51 sc).
Row 2: (RS) Ch 1, work 1 sc in same sc, (ch 1, sk 1 sc, work 1 sc in ch-1 sp) repeat across until 1 sc remains, work 1 sc in last sc, turn.
Rows 3-4: Repeat row 2.
Drop A (do not fasten off), pick up color B
Rows 5-8: With color B, repeat row 2.
Drop B (do not fasten off), pick up color A
Rows 9-12: With color A, repeat row 2.
Drop A (do not fasten off), pick up color B
Rows 13-60: Repeat rows 5-12 (6 times).
Rows 61-64: Repeat rows 5-8 for a total of 16 alternating stripes (8 in color A and 8 in color B).
Fasten off. Weave in ends using tapestry needle.
Back Panel
Repeat the front panel substituting color C for A, and color D for B.
Strap
With color D ch 171.
Row 1: (RS) work 1 sc in 2nd ch from hook, work 1 sc in each ch across, turn– (170 sc).
Rows 2-7: Ch 1, work 1 sc in each sc across, turn.
Fasten off leaving a 12”/30.5 cm tail for sewing.
Finishing Strap
Whip stitch the short ends together to form a loop. Fasten off. Weave in ends using tapestry needle.
Attaching strap to Front Panel
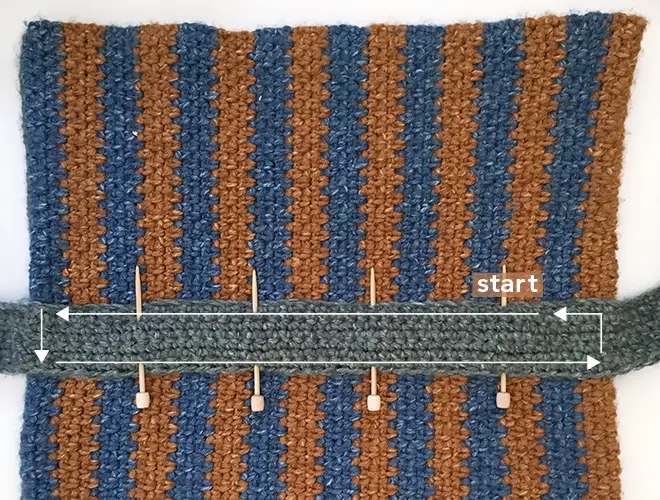
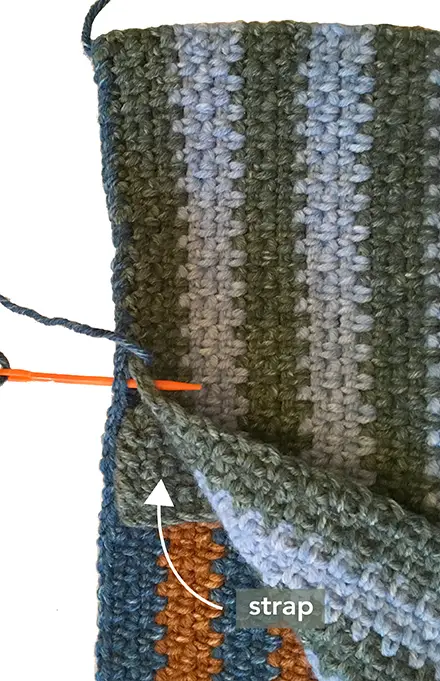
Lay the front panel with RS facing up, row 1 to your right and row 64 to your left. Lay the strap loop on top of the front panel with RS facing up and row 7 closest to your body. Line up the whipstitched edge to the left edge of the front panel and the top edge of the strap 5.5”/14 cm from the top of the front panel (image 1).

Pin in place.
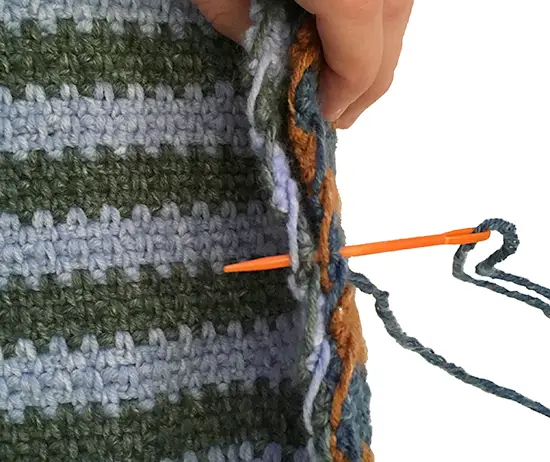
Using a 60”/152 cm strand of color D, attach the strap to the bag with a running stitch along all four edges of the strap where it meets the panel (image 2). On the short sides take care to stitch 1 row away from the sides of the panel. This row on the panel needs to stay exposed for seaming the bag together. Weave in ends using a tapestry needle.
Finishing
Lay the back panel with RS facing down, row 64 to your right, row 1 to your left, and the edge with the carried yarn closest to you. Lay the front panel on top of the back panel in the same position (with RS facing down, row 64 to your right, row 1 to your left, and the edge with the carried yarn closest to you). The RS and WS will be together and the strap will be sandwiched in between. Cut a piece of color B 8.5 feet/2.6 meters long (or two pieces half this length if you prefer to use a shorter thread and sew in two sections as I do).
Starting in the top left corner, mattress stitch down the left edge, across the edge with the carried yarn, and up the right edge. Important: when stitching next to the strap be sure NOT to catch any strands of the strap in the seam (image 3). And when stitching along the bottom edge be sure to keep the carried strands outside your stitches (image 4). This will insure they are hidden inside the bag. Weave in ends.
Turn the tote right side out and flop the top of the back panel over the front panel. You are done!
I’d LOOOOOOVE to see your Slouch Jean Tote. Please tag me @crochetwithmarybeth on social media so I can see your beautiful creations!

Mary Beth Cryan has been designing crochet patterns for over 4 years. Prior, Mary Beth worked as a professional illustrator and product designer with a specialty in paper crafts for 18 years. She has authored and illustrated 17 paper craft books, countless pop-up greeting cards, and many paper craft kits. She received 3 LOUIE Awards from the National Greeting Card Association. Some of her clients included MoMA (Museum of Modern Art NYC), American Girl, Dover Publications, Peter Pauper Press, Ranger Rick Magazine, Highlights magazine and many others. She earned a Bachelor of Fine Arts from Syracuse University in 2000.