
This post may include affiliate links, view our disclosure policy for details.
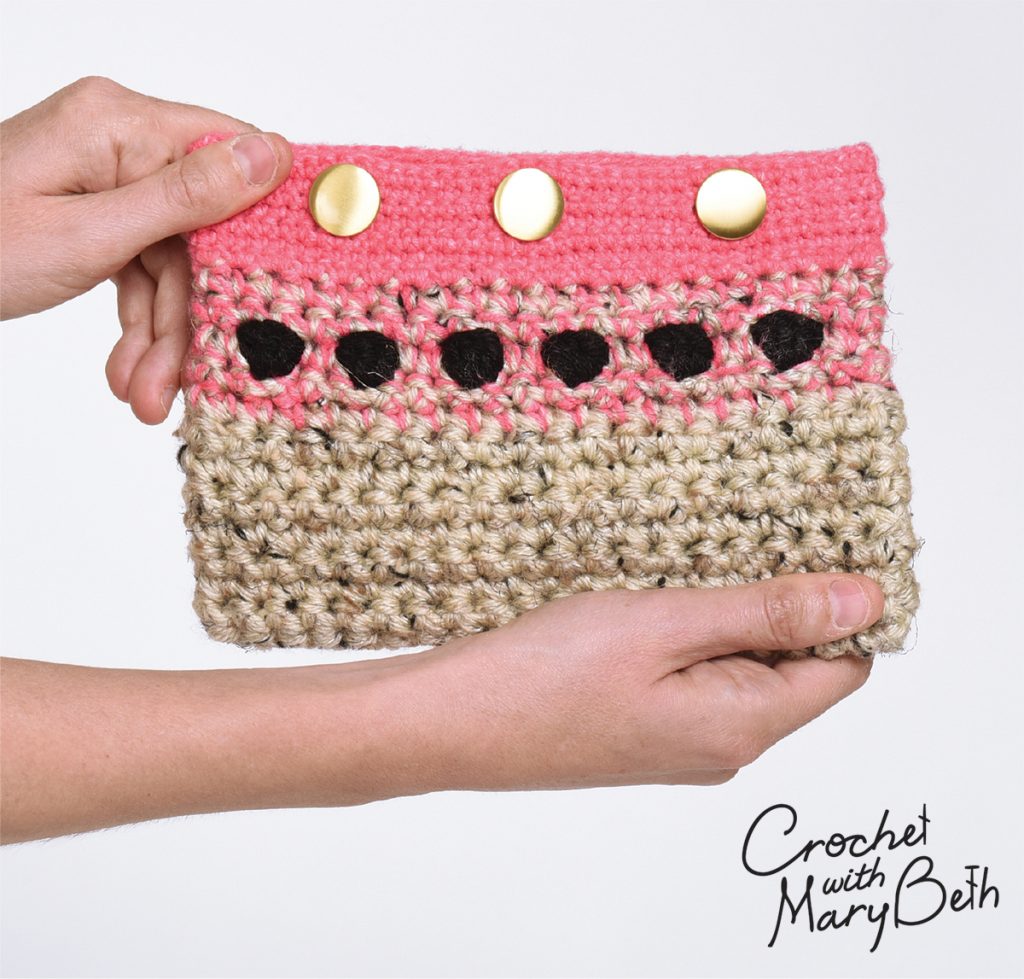
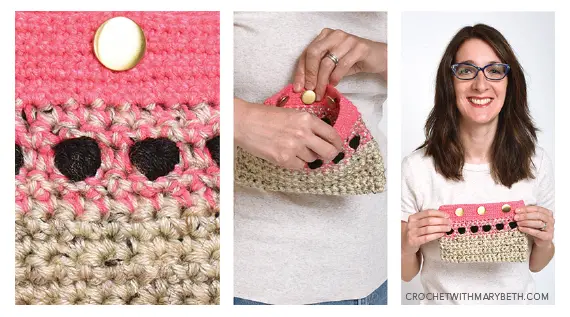
This little polka pouch is multi functional. Throw it in a big tote for some organization or on fancy days use it as a clutch. That’s why I added the gold buttons, for my fancy smancy days. Hmmm, when was the last time I had one of those? Uhhhh, hmmm, wellllll, maybe I’ll just keep my library card in it and and dazzle the librarian when I pull it out of my book tote.
The inspiration for the polka pouch was definitely the color. I saw a cream, pink, and black sweater and looooooved the combination. I bought the pink to match the exact color in the sweater. When I got home I went stash diving for black and cream. That’s when I spotted my Vanna’s Choice Oatmeal tweed! I flipped out because it looked AMAZING with the pink and was so unexpected. That’s my favorite kind of yarn color combo, the unexpected ones.
After much deliberation, I decided on buttons as a closure. I made a crochet pouch similar to this one with a zipper a little while ago that I really liked but zippers can be intimidating (even though once you sew your first one you see it’s actually easy, might have to do a video tutorial on that). So I scoped out the button section at Joann’s and snagged these three gold beauties with my 50% off coupon. Savvy shopper, oh yeah! And buttons are easy peasy to attach.
You may have heard me mention my “Seeing Spots Bag” collection. This is the third out of four. There is one more to come and it’s the star of the show!
Okay, I’m done with my story. On to the free crochet pattern.
Purchase the pdf:
Save for later:
Polka Pouch
Materials:
- Lion Brand Vanna’s Choice worsted 4-Medium (100% acrylic, 171 yds/156 m, 3.5 oz/100g), Color (A) Oatmeal, 1 skein, Color (C) Black, 1 skein
- Lion Brand Jeans Yarn worsted 4-Medium (100% acrylic, 246 yds/225 m, 5 oz/100g), Color (B) Bermuda Shorts, 1 skein

- Crochet hooks sizes US J/10 (6 mm) and US F/5 (3.75 mm)
- Tapestry needle
- Stitch Markers
- Scissors
- Three .75”/20 mm shank buttons, I used La Mode 200002621, Gold, Metal, Shank, Pack of 3, by Blumenthal Lansing from JOANN Stores
Gauge:
Using hook US J/10 (6 mm) 10 stitches and 12 rows = 4”/10 cm in single crochet holding two strands of A together as one
Using hook US F/5 (3.75 mm) 20 stitches and 22 rows = 4”/10 cm in single crochet using one strand of B
Finished Measurements:
Project Level:
Abbreviations:
ch – chain(s)
sc – single crochet
yo – yarn over
st(s) – stitch(es)
RS – right side
AB – one strand each of A and B held together as one
CC – two strands of C held together as one
Special Stitches:
If you’d like to see a video demonstration of the special stitch click (here).
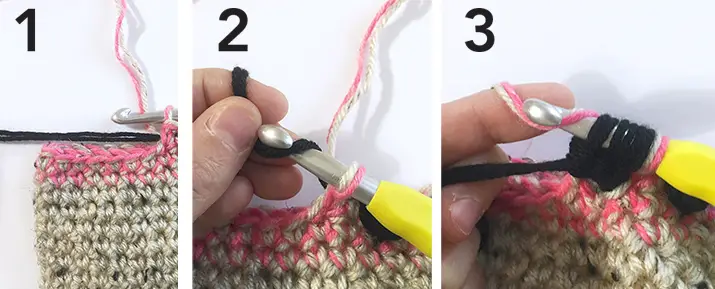
Multicolored Three Double Crochet Bobble (Bobble): Each bobble has a sc before and after it. Do not pick up CC on last yo of sc before each bobble. Instead, finish the sc completely with AB (image 1). Yo with CC (throughout bobble until told to switch).
Start the first double crochet with a yo of CC (image 2), insert hook into next sc, yo and pull through – 3 loops (2 CC and 1 AB) on hook , yo and pull through 2 loops on hook – 2 loops on hook (1 CC and 1 AB), yo, insert hook into same stitch, yo, pull through – 4 loops on hook (3 CC and 1 AB), yo and pull through 2 loops on hook – 3 loops on hook (2 CC and 1 AB), yo, insert hook into same stitch, yo, pull through – 5 loops on hook (4 CC and 1 AB), yo and pull through 2 loops on hook – 4 loops on hook (3 CC and 1 AB), drop CC, pick up AB, yo with AB (image 3) and pull through all 4 loops – 1 loop on hook (1 AB). Push bobble to outside.
Video Tutorial:
Notes:
-
- The pattern is written in US terms.
-
- For the first 13 rounds you will be holding two strands of yarn together as one. For the last 7 rounds you will be using 1 strand of yarn.
-
- The pattern is worked in joined, turned rounds. It is important to turn at end of each round. If your pouch does not lay flat or the bobbles don’t end up centered you most likely missed a turn or two. Put a marker in the first and last stitch of every row and move them up as you go to insure your stitch count stays correct.
-
- The pattern is worked from the bottom up.
-
- Ch 1 does not count as a sc throughout the pattern.
-
- The Button Band should extend straight up from the pouch. If it doesn’t the gauge is off. If the band flairs out go down a hook size. If the band flairs in go up a hook size.
-
- Bobbles are on both the front and back of pouch.
-
- The bobble is a Multicolored Three Double Crochet Bobble. See explanation above.
- This pattern has been tested and professionally tech edited.
Instructions
Pouch
Using the larger hook and holding 2 strands of A together as one, ch 21.
Round 1: (RS) work 1 sc in 2nd ch from hook, work 1 sc in next 18 ch, work 2 sc in last ch (rounding the corner); working in opposite side of foundation ch, work 1 sc in remaining 19 ch, join with a slip st to first sc, turn– (40 sc).
Round 2: Ch 1, skipping over joining sl st, work first sc in last sc from prev round, work 1 sc in each sc around, join with a slip st to first sc, turn.
Rounds 3-8: Repeat round 2.
Drop and fasten off one strand of A. Pick up one strand of B.
Rounds 9-10: Repeat round 2.
At the beginning of round 11, anchor CC by stitching over CC with AB. Continue to sc with AB and stitch over CC (image 1) to obtain a nice clean inside (image 4).
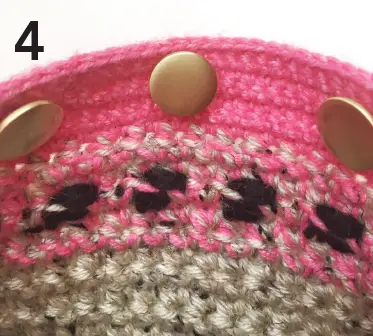
Round 11: Double check that you are working on the RS for this row so the bobbles go to the outside of the bag. With AB ch 1, skipping over joining sl st, work first sc in last sc from prev round, work 1 sc in next sc, (with CC work 1 bobble in next sc, with AB work 1 sc in next 2 sc) six times, work 1 sc in next 2 sc, (with CC work 1 bobble in next sc, with AB work 1 sc in next 2 sc) six times, with AB join with a slip st to first sc, turn– (12 bobbles, 28 sc).
Fasten off two strands of C. Weave in ends using tapestry needle.
Rounds 12-13: With one strand each of A and B held together as one repeat Round 2– (40 sc).
Drop and fasten off A. Weave in ends using tapestry needle.
Button Band
Switch to smaller hook.
Round 14: With one strand of B, ch 1, skipping over joining sl st, work 2 sc in last sc from prev round, work 2 sc in each sc around, join with a slip st to first sc, turn– (80 sc).
Round 15-17: Ch 1, skipping over joining sl st, work first sc in last sc from prev round, work 1 sc in each sc around, join with a slip st to first sc, turn.
Round 18: Ch 1, skipping over joining sl st, work first sc in last sc from prev round, work 1 sc in next 46 sc, (ch 4, skip 4, work 1 sc in next 7 sc) three times (once for each buttonhole), join with a slip st to first sc, turn– (68 sc, 3 ch-4 spaces).
Round 19: Ch 1, skipping over joining sl st, work first sc in last sc from prev round, work 1 sc in next 6 sc, (work 4 sc in ch-4 space, work 1 sc in next 7 sc) two times, work 4 sc in ch-4 space, work 1 sc in each remaining sc around, join with a slip st to first sc, turn– (80 sc).
Round 20: Ch 1, skipping over joining sl st, work first sc in last sc from prev round, work 1 sc in each sc around, join with a slip st to first sc– (80 sc).
Fasten off. Weave in ends using tapestry needle. With 1 strand of B, sew buttons to the inside, opposite the button holes. The buttons are intentionally positioned closer to the top of the band as a design detail.
I’d LOOOOOOVE to see your Polka Pouch. Please tag me @crochetwithmarybeth on social media so I can see your beautiful creations!
Mary Beth Cryan has been designing crochet patterns for over 4 years. Prior, Mary Beth worked as a professional illustrator and product designer with a specialty in paper crafts for 18 years. She has authored and illustrated 17 paper craft books, countless pop-up greeting cards, and many paper craft kits. She received 3 LOUIE Awards from the National Greeting Card Association. Some of her clients included MoMA (Museum of Modern Art NYC), American Girl, Dover Publications, Peter Pauper Press, Ranger Rick Magazine, Highlights magazine and many others. She earned a Bachelor of Fine Arts from Syracuse University in 2000.