
This post may include affiliate links, view our disclosure policy for details.
Introducing the free crochet pattern, Two Tone Tee with Ties! Try saying that five times fast. Don’t worry, crocheting this top is much easier than saying its name.
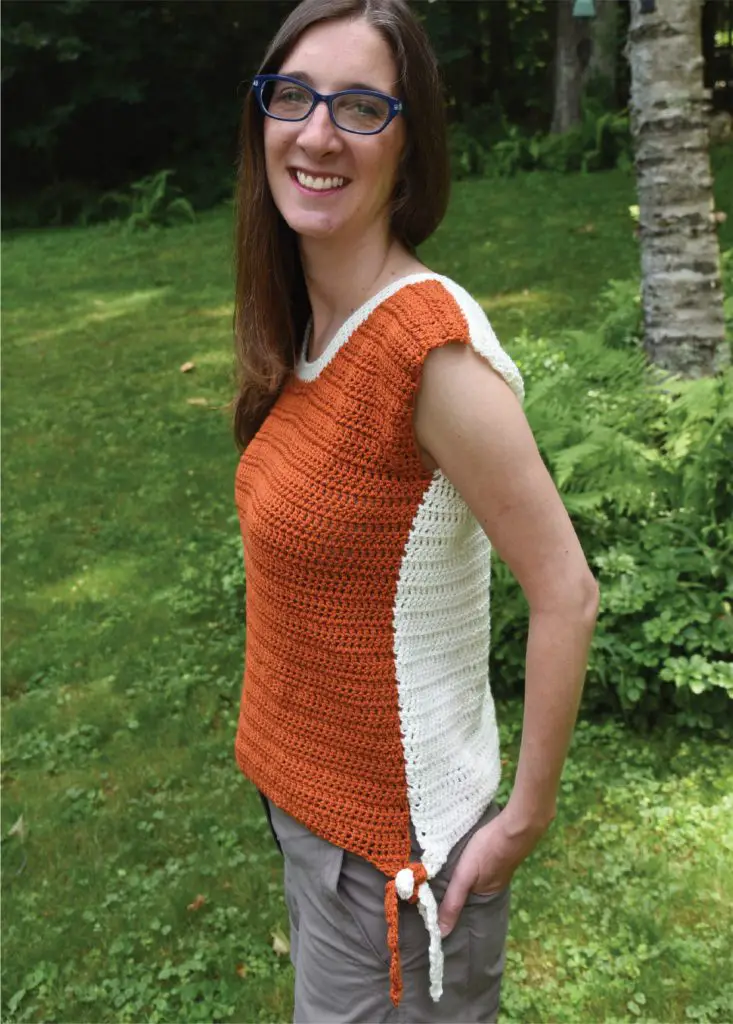
This top is unique because the front is a different color than the back. It’s true. It’s never been easier to surprise your friends, just turn around and amaze them with the color change.
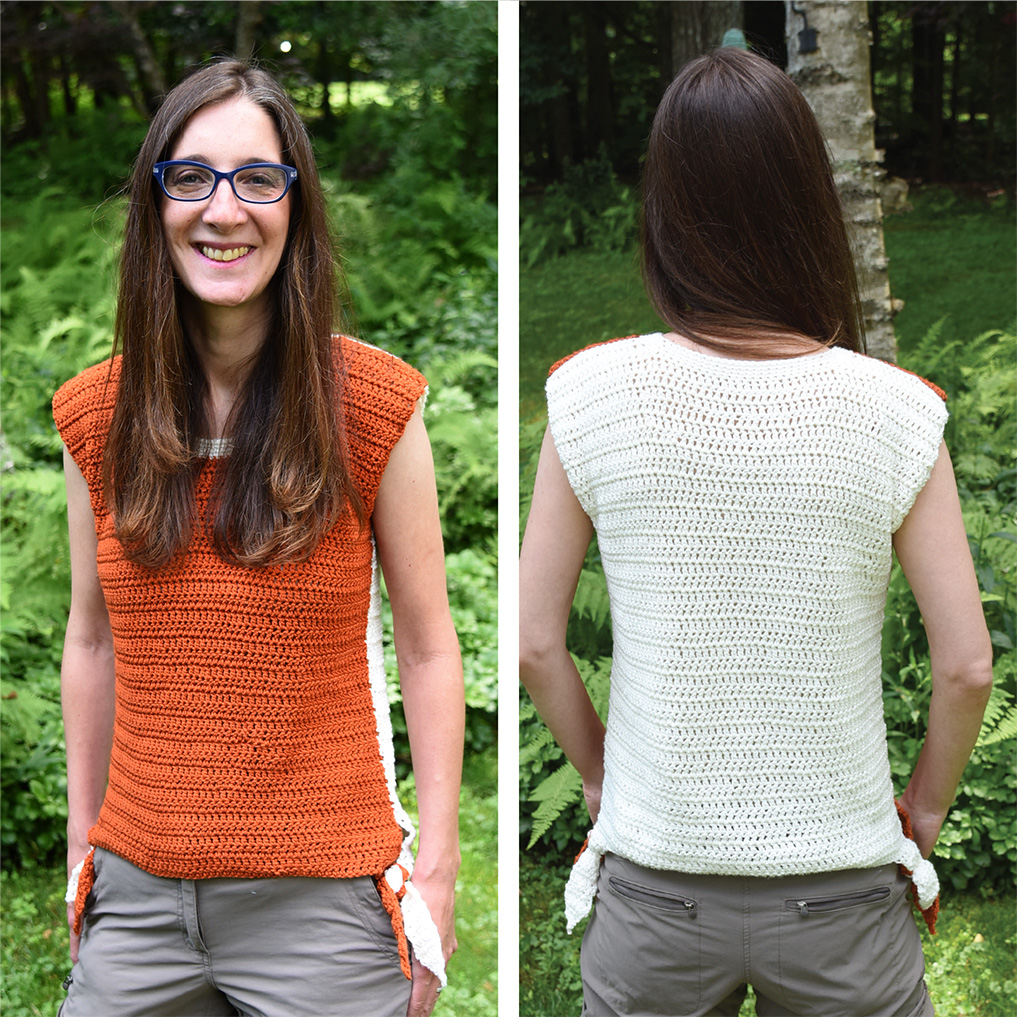
The top of the tee is just wide enough to flutter over your shoulders and create cute little sleeves without having to actually stitch and attach little sleeves. Love that!
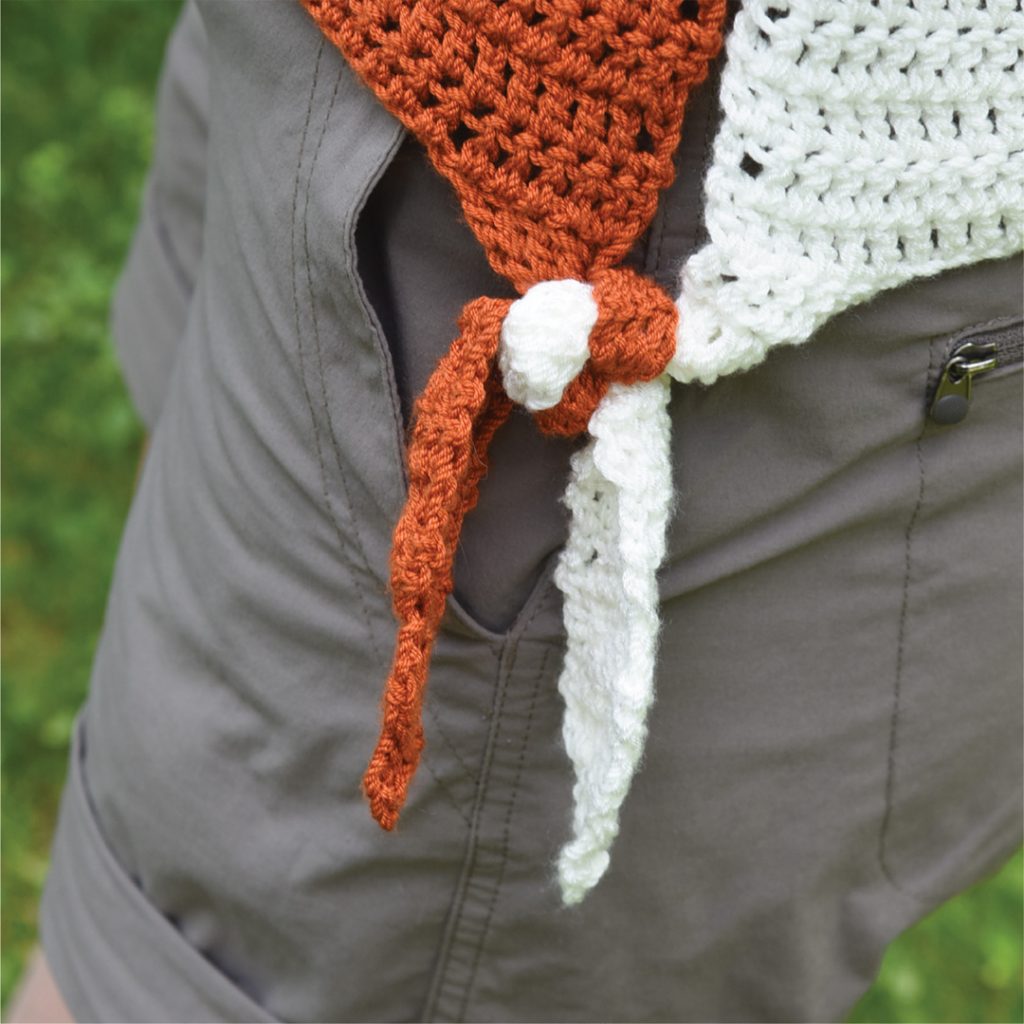
The two colors are tied together visually and physically with two adorable little ties on either side of the shirt. Ties are in style, and this tee has them!
You’d think my favorite part of this tee is the ties but it’s actually the neckline. The little scoop looked beautiful and fit perfectly on all my testers in all the sizes!

You can make this top! It’s easy. The main body of the top is all double crochet, nothing complicated. And the neckline edging is simply single crochet in the back loop only.
No need to sew either! The seams are all slip stitched so no getting out that pesky needle. Well, except to weave in the ends but unfortunately I don’t know a way around that:)


You can crochet assured you won’t hit any confusing spots or typos because I had this pattern professionally tech edited and tested for you.
I’ve also included charts just so you can double check your stitches. But you do not need to know how to read charts to complete the pattern. The instructions are enough. I just got a little carried away making charts. Ha-ha.
I hope you enjoy this pattern and enjoy coming into a room one color and leaving another color!
Two Tone Tee with Ties
Materials:
- Lion Brand Yarns ZZ Twist Yarn, worsted 4-Medium (100% acrylic, 246 yds/225 m, 3.5 oz/100 g), 2 (3, 3, 3) skeins each of Color (A) Pumpkin and Color (B) Ecru

- Crochet hook size US I/9 (5.5 mm)
- Tapestry needle
- 1 Stitch Marker
- Scissors
Gauge:
14 stitches and 8 rows = 4”/10 cm in dc
Sizes:
S (M, L, XL)
To Fit Bust:
32-34 (36-38, 40-42, 44-46)” / 81–86 (91.5–96.5, 101.5–106.5, 111.5–117) cm
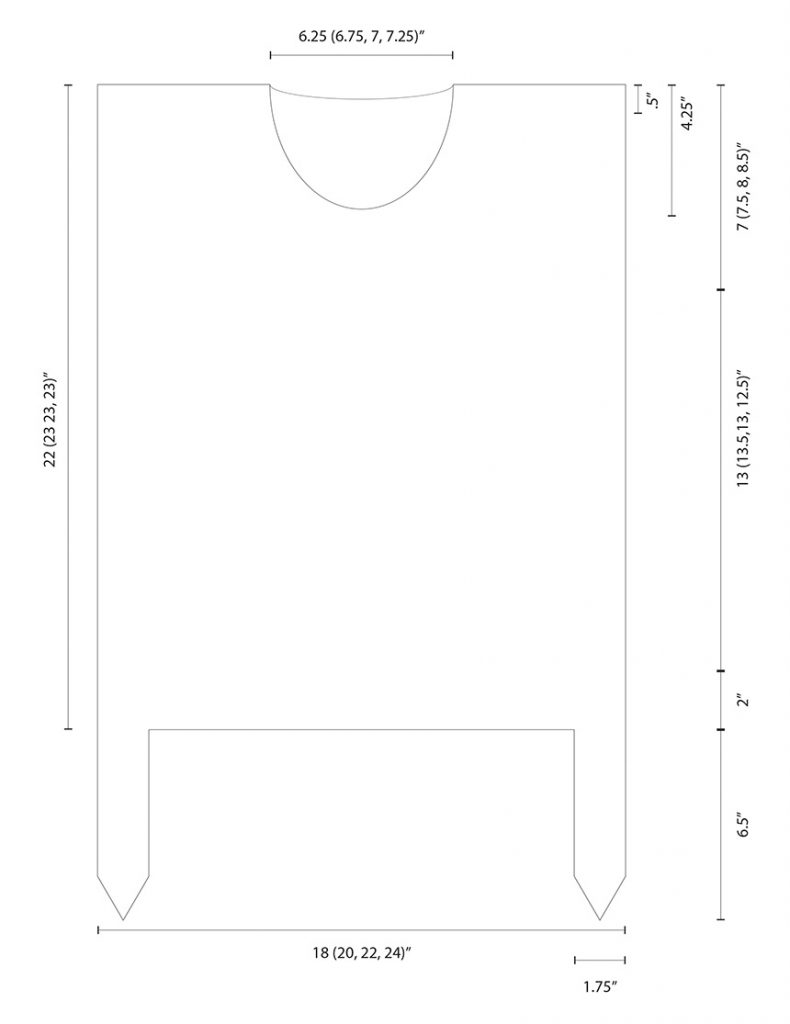
Finished Measurements
- Bust: 36 (40, 44, 48)” / 91.5 (101.5, 112, 122) cm
- Length: 22 (22.5, 22.5, 23)” / 56 (57, 57, 58.5) cm
- Width: 18 (20, 22, 24)” / 46 (51, 56, 61) cm
Project Level:

Abbreviations:
- ch(s) – chain(s)
- sc – single crochet
- st(s) – stitch(es)
- dc – double crochet
- BLO – back loop only
- RS – Right Side
- WS – Wrong Side
- dc2tog – double crochet 2 stitches together
Notes:
- The pattern is written in US terms.
- This pattern has been tested and professionally tech edited for accuracy and clarity.
- Ch 1 does not count as a st throughout the pattern.
- Ch 3 does count as a dc throughout the pattern.
- Top is worked in two pieces from bottom up, shoulders are seamed, collar is stitched, and sides are seamed.
- The neckline edging is worked in joined and not turned rounds. Do not turn at the end of the rounds.
Instructions
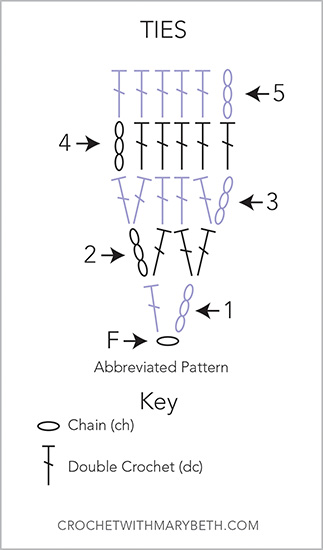
First Tie
With color A, ch 4.
Row 1: (RS) work 1 dc in 4th chain from hook (first 3 chs count as first dc), turn- <2 dc> .
Row 2: Ch 3 (counts as dc), work 1 dc in same dc, work 2 dc in top of ch-3, turn- <4 dc> .
Row 3: Ch 3, work 1 dc in same dc, work 1 dc in next 2 dc, work 2 dc in top of ch-3, turn- <6 dc>.
Row 4: Ch 3, work 1 dc in next 4 dc, work 1 dc in top of ch-3, turn.
Rows 5 – 12: Repeat row 4.
Fasten off. Weave in ends using tapestry needle.
Second Tie
With color A, repeat rows 1-12 of First Tie. Do NOT fasten off.
Front and Attaching Ties
Row 1: (RS) Ch 3, work 1 dc in next 4 dc, work 1 dc in top of ch-3, ch 51 (58, 65, 72), (with RS of First Tie facing up) work 1 dc in first dc (top right) of First Tie, work 1 dc in next 4 dc, work 1 dc in top of ch-3, turn- <12 dc, 51 (58, 65, 72 ch)>.
Row 2: Ch 3, work 1 dc in next 5 dc, work 1 dc in next 51 (58, 65, 72) ch (Work into chain as you would a foundation chain. Do not work into ch space.), work 1 dc in next 5 dc, work 1 dc in top of ch-3, turn- <63 (70, 77, 84 dc)>.
Rows 3 – 34 (36, 36, 36): Ch 3, work 1 dc into each dc across, work 1 dc in top of ch-3, turn.***
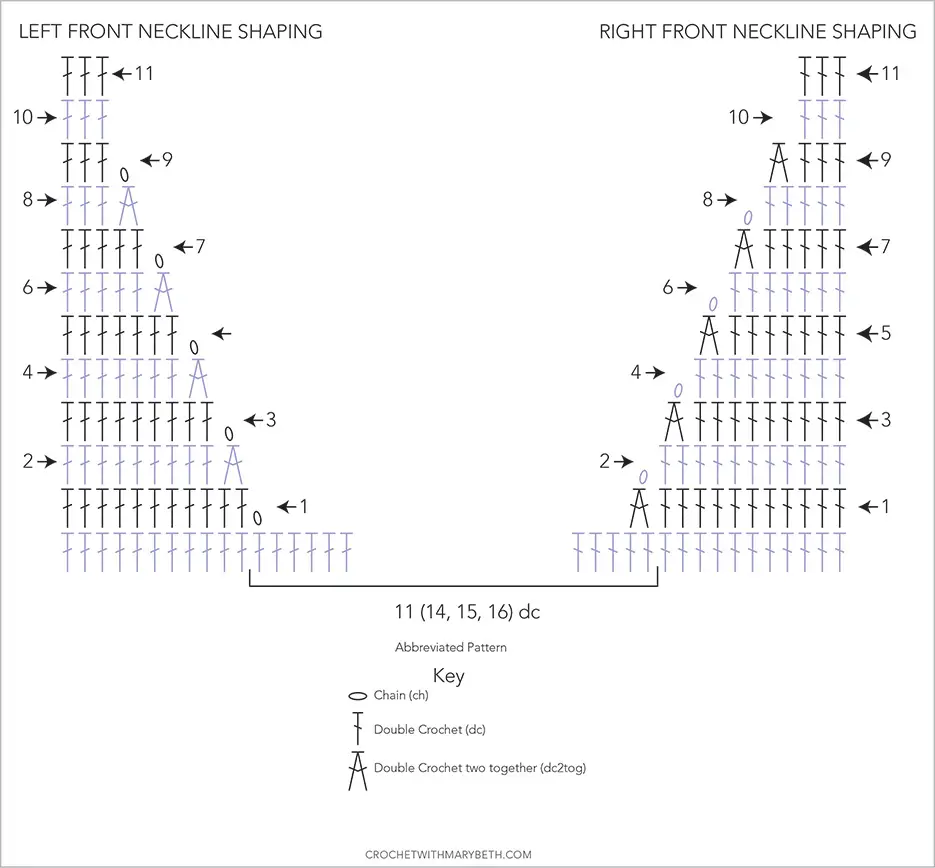
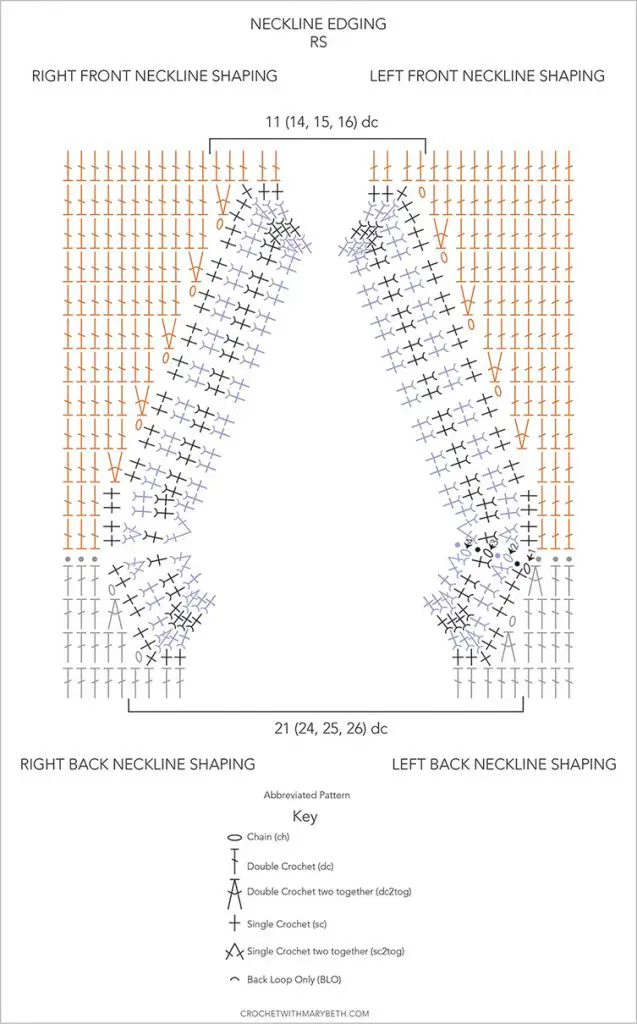
Right Front Neckline Shaping
Row 1: Ch 3, work 1 dc in next 23 (25, 28, 31) dc, dc2tog over next two dc, leave rest of row unworked, turn- <25 (27, 30, 33 dc)>.
Row 2: Ch 1, (ch 1 does not count as a st) skip first st, work 1 dc in next st (This dc can be hard to see and easy to miss, I recommend marking it with a stitch marker.), work 1 dc in each dc across, work 1 dc in top of ch-3, turn- <24 (26, 29, 32 dc)>.
Row 3: Ch 3, work 1 dc in next dc and each dc across until 2 dc remain, work 1 dc2tog over next 2 dc, turn- <23 (25, 28, 31 dc)>.
Row 4: Ch 1, skip first st, work 1 dc in next st, work 1 dc in each dc across, work 1 dc in top of ch-3, turn- <22 (24, 27, 30 dc)>.
Row 5: Repeat row 3- <21 (23, 26, 29 dc)>.
Row 6: Repeat row 4- <20 (22, 25, 28 dc)>.
Row 7: Repeat row 3- <19 (21, 24, 27 dc)>.
Row 8: Repeat row 4- <18 (20, 23, 26 dc)>.
Row 9: Repeat row 3- <17 (19, 22, 25 dc)>.
Rows 10 – 11: Ch 3, dc in next dc and each dc across, work 1 dc in top of ch-3, turn.
Fasten off. Weave in ends using tapestry needle.
Left Front Neckline Shaping
With RS facing up, continue on Row 1 of Right Front Neckline shaping. Starting with first unworked stitch on front panel after shaping row 1, skip next 11 (14, 15, 16) unworked dc, join yarn in next dc. First ch of row 1 is worked in same dc as joining.
Row 1: Ch 1, skip first st, work 1 dc in next st, work 1 dc in each dc across, work 1 dc in top of ch-3, turn- <25 (27, 30, 33 dc)>.
Row 2: Ch 3, work 1 dc in next dc and each dc across until 2 dc remain, work 1 dc2tog over next 2 dc, turn- <24 (26, 29, 32 dc)>.
Row 3: Repeat row 1- <23 (25, 28, 31 dc)>.
Row 4: Repeat row 2- <22 (24, 27, 30 dc)>.
Row 5: Repeat row 1- <21 (23, 26, 29 dc)>.
Row 6: Repeat row 2- <20 (22, 25, 28 dc)>.
Row 7: Repeat row 1- <19 (21, 24, 27 dc)>.
Row 8: Repeat row 2- <18 (20, 23, 26 dc)>.
Row 9: Repeat row 1- <17 (19, 22, 25 dc)>.
Rows 10 – 11: Ch 3, dc in next dc and each dc across, work 1 dc in top of ch-3, turn.
Fasten off. Weave in ends using tapestry needle.
Back
With color B,
Repeat First Tie. Repeat Second Tie. Repeat Front and Attaching Ties until ***.
Work an additional 8 rows for all sizes.
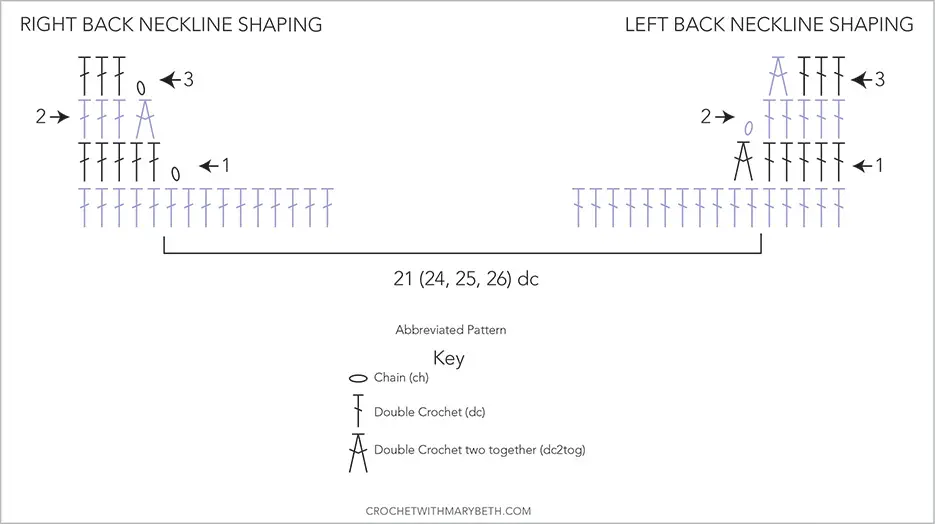
Left Back Neckline Shaping
Row 1: Ch 3, work 1 dc in next 17 (19, 22, 25 dc) dc, work 1 dc2tog over next 2 dc, turn- <19 (21, 24, 27 dc)>.
Row 2: Ch 1, skip first st, work 1 dc in next st and each dc across, work 1 dc in top of ch-3, turn- <18 (20, 23, 26 dc)>.
Row 3: Ch 3, work 1 dc next dc and each dc across until 2 dc remain, work 1 dc2tog over next 2 dc, turn- <17 (19, 22, 25 dc)>.
Fasten off. Weave in ends using tapestry needle.
Right Back Neckline Shaping
With RS facing up, starting with first unworked st after row 1 of left neck shaping, skip next 23 (26, 27, 28) sts, join yarn in next. First ch of row 1 is worked in same dc as joining.
Row 1: Ch 1, skip first st, work 1 dc in next st and each dc across, work 1 dc in top of ch-3, turn- <19 (21, 24, 27 dc)>.
Row 2: Ch 3, work 1 dc next dc and each dc across until 2 dc remain, work 1 dc2tog over next 2 dc, turn- <18 (20, 23, 26 dc)>.
Row 3: Ch 1, skip first st, work 1 dc in next st and each dc across, work 1 dc in top of ch-3, turn- <17 (19, 22, 25 dc)>.
Fasten off. Weave in ends using tapestry needle.
Seaming Shoulders
Place Front and Back with right sides together and the Front on top. With color A, seam the shoulders using a slip stitch. Keep the Front on top when you seam both the right and left shoulders. Do not flip the garment. This way the color A slip stitches will blend in with the color A side (Front side). Weave in ends using tapestry needle.
Neckline edging
With color B (the back) on top and wrong sides together, join yarn in the side of the first dc along the back right shoulder edge (image 1). First ch of row 1 is worked in same dc side as joining.
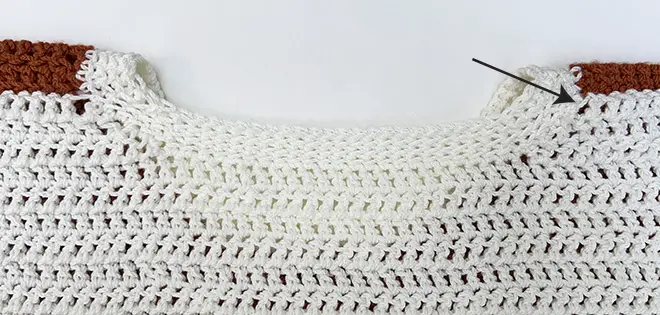
Rnd 1: Ch 1, work 2 sc in the side of next 3 rows, work 1 sc in next 23 (26, 27, 28) dc, work 2 sc in the side of next 3 rows, (the next st is on the front) work 2 sc in the side of next 11 rows, work 1 sc in next 11 (14, 15, 16) dc, work 2 sc in the side of next 11 rows, join to first sc, (DON’T turn on this round or any throughout pattern)- <90 (96, 98, 100 sc)>.
Rnd 2: Ch 1, work 1 sc2tog in BLO over next 2 sc, work 1 sc in BLO of next 3 sc, work 1 sc2tog in BLO over next 2 sc, work 1 sc in BLO of next 21 (24, 25, 26) sc, work 1 sc2tog in BLO over next 2 sc, work 1 sc in BLO of next 3 sc, work 2 sc2tog in BLO over next 4 sc, work 1 sc in BLO of next 19 sc, work 1 sc2tog in BLO over next 2 sc, work 1 sc in BLO of next 9 (9, 12, 13, 14) sc, work 1 sc2tog in BLO over next 2 sc, work 1 sc in BLO of next 19 sc, work 1 sc2tog in BLO over next 2 sc, join to first sc- <(82 (88, 90, 92 sc)>.
Rnd 3: Ch 1, work 1 sc in BLO of each sc around, join to first sc.
Rnd 4: Ch 1, work 1 sc2tog in BLO over next 2 sc, work 1 sc in BLO of next sc, work 1 sc2tog in BLO over next 2 sc, work 1 sc in BLO of next 21 (24, 25, 26) sc, work 1 sc2tog in BLO over next 2 sc, work 1 sc in BLO of next sc, work 2 sc2tog in BLO over next 4 sc, work 1 sc in BLO of next 17 sc, work 1 sc2tog in BLO over next 2 sc, work 1 sc in BLO of next 9 (9, 12, 13, 14) sc, work 1 sc2tog in BLO over next 2 sc, work 1 sc in BLO of next 17 sc, work 1 sc2tog in BLO over next 2 sc, join to first sc2tog- <74 (80, 82, 84 sc)>.
Fasten off. Weave in ends using tapestry needle.
Finishing
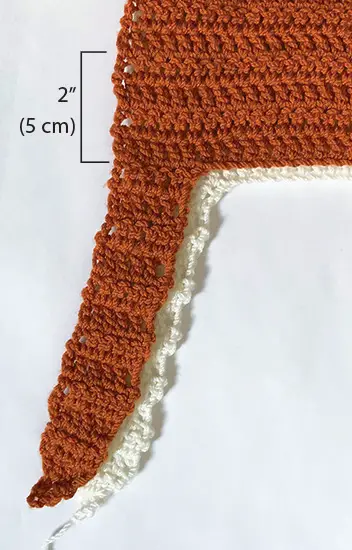
Place Front and Back with RS together and the Front on top. With color A, seam the sides starting 2” (5 cm) from the bottom edge (not the bottom of the ties) (image 2) using a slip stitch until 7 (7.5, 8, 8.5)” (18 (19, 20, 21.5) cm) or desired arm hole length remains. Keep the Front on top when you seam both the right and left sides. Do not flip the garment. This way the color A slip stitches will blend in with the color A side (Front side). Weave in ends using tapestry needle.
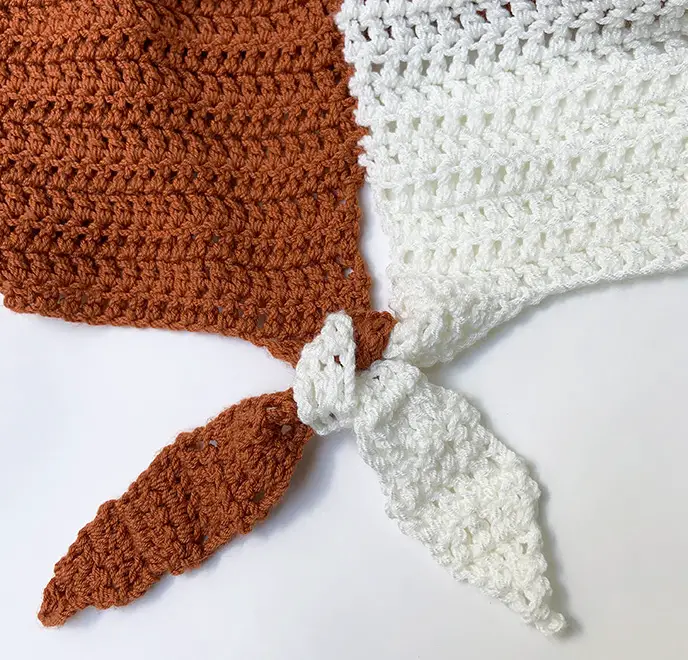
Turn right side out. Tie the corresponding side ties together using a square knot. (image 3)


Mary Beth Cryan has been designing crochet patterns for over 4 years. Prior, Mary Beth worked as a professional illustrator and product designer with a specialty in paper crafts for 18 years. She has authored and illustrated 17 paper craft books, countless pop-up greeting cards, and many paper craft kits. She received 3 LOUIE Awards from the National Greeting Card Association. Some of her clients included MoMA (Museum of Modern Art NYC), American Girl, Dover Publications, Peter Pauper Press, Ranger Rick Magazine, Highlights magazine and many others. She earned a Bachelor of Fine Arts from Syracuse University in 2000.